RabbitMQ in Sql Server CLR

sql CLR 程序集部署步骤比较多且复杂 这里自己记录一下

https://gitee.com/wilsonjw/RabbitMQ-SqlServer

项目主要参考引用下面这些博客

1 项目在nberglund 的开源项目上修改而来 https://github.com/nberglund/RabbitMQ-SqlServer

2 二进制dll 转换工具 https://github.com/SqlQuantumLeap/BinaryFormatter

3 关于sql server 安全程序及讨论及解决方案

部署的基本环境

  • 数据库服务器版本 MSSql Server 2014+
  • MQ .net 客户端版本  RabbitMq.Client 4.0(.net framework 4)

低于2014 版本的sql server 只能支持到 .net framework 3.5 在我的项目中没有去做支持,nberglund 的开源项目中有对应的 程序集

解决方案的结构

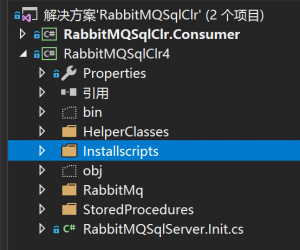
  • RabbitMQSqlClr4:最终要部署到clr 中的程序集 处理消息的发送
  • RabbitMQSqlClr.Consumer:是一个控制台mq 消费端 接收消息后处理消息的。
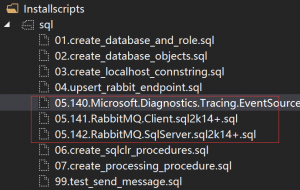
  • 算上 依赖的关联   RabbitMQ.Client    Microsoft.Diagnostics.Tracing.EventSource  实际注册到 CLR 中的程序及一共有3个dll

在安装脚本中已经通过BinaryFormatter工具将编译后的dll 转换成了二进制放在了脚本中了。

部署成功后在sql server 中看见这3个程序集

按数字顺序执行部署脚本 部署时会有涉及sql clr 安全性的问题 这个请参考引用博客中的讨论 这里的处理是关闭安全选项 部署不安全的程序集

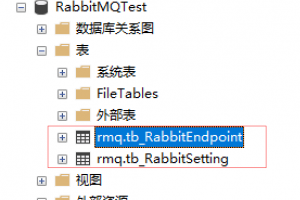
部署完 程序集后 我们需要配置 脚本中创建的一些配置表 填入 服务器登陆信息等等配置

tb_RabbitEndpoint 表配置当前数据库连接例如:server=127.0.0.1,25835; database=RabbitMQTest; uid=sa; pwd=pw

tb_RabbitSetting 表配置Mq 服务器相关信息 :

最后 全部配置完成后 可以 调用 pr_SomeProcessingStuff 存储过程 发送mq 消息

如果修改mq和数据库连接配置后 感觉 没有生效的话 可以重启一下 sql server 数据库实例

Topshelf and Hangfire run .NetCore winservice

Hangfire use Topshelf at NetCore winservice

项目模板描述:
项目通过 [Topshelf 官方示例](https://github.com/Topshelf/Topshelf/tree/develop/src/SampleTopshelfService) 代码 加入并集成了 Hangfire.AspNetCore 任务系统。最后通过 toeshelf 把 netcore App(Hangfire)安装在windows 环境下 作为win服务运行。

Demo template

整体结构

Hangfire –使用 sqlserver 作为存储job 引擎
ASP.NET CORE WEB APP OR API –项目中 集成 Hangfire Client
WinServices(Core runtime) — 运行 Hangfire 任务和 Hangfire 仪表板 (上面的模板项目就是这个服务)

环境运行时

  • NetCore Console– NetCore 2.1
  • TopShelf –4.1.0.180-develop
  • Hangfire.AspNetCore (1.6.21)
  • Hangfire.SqlServer 1.6.21
  • Microsoft.AspNetCore.App 2.1.6
  • Serilog
  • Topshelf.Serilog

Caddy proxy asp.net core 3 kestrel grpc webapp

Caddy proxy asp.net core 3 kestrel grpc webapp

开发环境

Caddy Server

caddy_v1.0.0_windows_amd64

.net core 3

dotnet-sdk-3.0.100-preview4-011223-win-x64

openssl

Win64OpenSSL-1_1_0j.exe

system win 10 pro

结构流程

  • grpc on kestrel server https://localhost:50051
  • grpc client request call grpc on caddy proxy https://localhost:8080
  • CaddyServer //https://localhost:8080

grpc client(H2-TLS 协议) 访问 –> CaddyServer –> 反向代理(H2-TLS 协议) –> grpc on kestrel server

这里主要记录 部署过程 grpc 项目 使用 标准 模板 helloworld

grpc on kestrel server 配置

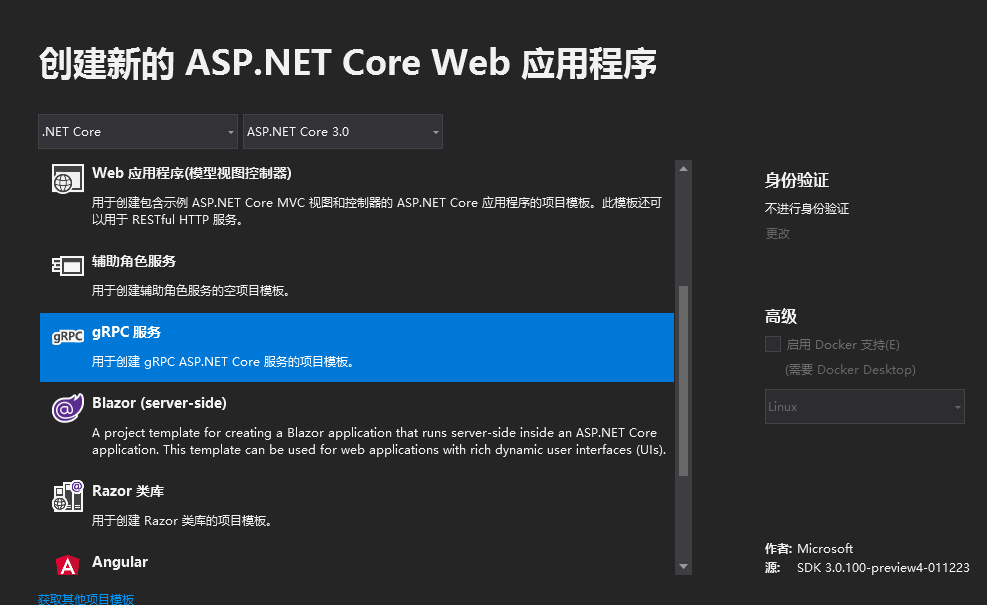
运行 vs2019 pre 2 内置的模板创建 一个 .net core grpc 项目
项目创建完成后 你就有一个 跑在 kestrel 上的 grpc server了

CaddyServer Http/2 反代协议 需要 kestrel 跑在 TLS https 下 如果kestrel 跑在http 下 Caddy会自动降级 http1 处理反代协议,所以 我们需要先把 本地 dotnet dev cert 证书 导入kestrel 我们先把

public static IHostBuilder CreateHostBuilder(string[] args) =>
Host.CreateDefaultBuilder(args)
.ConfigureWebHostDefaults(webBuilder =>
{
//webBuilder.UseUrls("https://localhost:50051")
webBuilder.ConfigureKestrel(options =>
{
options.Limits.MinRequestBodyDataRate = null;
options.Listen(IPAddress.Any, 50051, listenOptions =>
{
listenOptions.Protocols = Microsoft.AspNetCore.Server.Kestrel.Core.HttpProtocols.Http2;

//我们使用ASP.NET核心开发证书
listenOptions.UseHttps();

//或者我们可以使用.pfx格式的自己的证书 X509Certificate2
//listenOptions.UseHttps(cert);
});
});
webBuilder.UseSerilog();
webBuilder.UseStartup<startup>();</startup>

});

这里 grpc kestrel server 已经配置完成 可以通过 vs 拉起 黑屏运行了

CaddyServer 配置

Caddyfile 配置
主要就是加载 pem 证书 配置比较简单 直接贴 Caddyfile 了

https://localhost:8080

tls  ../localhostpubliccert.pem ../localhostprivatekey.pem

proxy / https://localhost:50051 {

}

grpc client 实现

grpc client 需要修改的是 默认Channel 使用了 非 TLS 安全传输访问通道 我们需要 修改成 加载证书的版本

//Channel channel = new Channel(“localhost:50051”, ChannelCredentials.Insecure);

string rootpath = AppDomain.CurrentDomain.BaseDirectory;
var filepath = Path.Combine(rootpath, "localhostdevcert.pem");
string pem = File.ReadAllText(filepath);

SslCredentials secureCredentials = new SslCredentials(pem);
Channel secureChannel = new Channel("localhost", 8080, secureCredentials);

var client = new Greeter.GreeterClient(secureChannel);

openssl 转换 localhsot 开发证书 格式

  • 开发证书安装
    dotnet dev-certs https –trust
  • 通过 MMC 导出 开发证书 保存成 .pfx 二进制的证书文件  
  • .pfx 转换 成 pem 格式的证书

安装 openssl 工具 转换 证书的格式 CaddyServer 需要 pem 格式的证书

证书和私钥

openssl pkcs12 -in d:\localhostdevcert.pfx -out d:\localhostdevcert.pem -nodes

私钥

openssl pkcs12 -in d:\localhostdevcert.pfx -nocerts -out d:\localhostprivatekey.pem -nodes

证书

openssl pkcs12 -in d:\localhostdevcert.pfx -nokeys -out d:\localhostpubliccert.pem -nodes

demo 源码

github rep

ps 引用参考

开发证书

Protocols in ASP .NET Core: HTTPS and HTTP/2

grpc-web Envoy .net core3 grpcServer

grpc-web Envoy .net core3 grpcServer

记录 前端 js 通过 Envoy 反代服务器 调用 .net core3 grpcServer 实验过程

整体流程图

实验通过参考 grpc-web 把后端 grpcServer由官网 node.js 实现 改写成 .net core 3 grpc 实现
加入 grpc ServerSteam 模式 hello world 例子

更新

  • 更新docker-compose 文件
  1. 弃用dockerfile 构建image 直接使用 volumes 挂载 yml 和证书 配置文件
  2. 加入Envoy-TLS 节点测试 https端点配置
  3. 自定义networks 配置
  4. https://github.com/11os/grpc-mp 编译小程序需要的 pb 生成工具[for linux]

环境

  • nodejs npm 主要前端编译库的需要
  • .net core 3 sdk pv3
  • vs2019 pv
  • docker ubuntu18.04
  • caddyServer 1.0
  • chrome74

实验预期效果

  • grpc-web clinet 一次请求 一次响应调用
  • grpc-web clinet ServerSteam 一次请求 Server 流式输出响应
  • demo地址

端点配置 部署环境

端点url描述
grpc-weblocalhost:8081web 前端页面
EnvoyServerloclhost:8080反代-docker 部署
grpcServer netcore3loclhost:9090rpc接口 docker 部署
Envoy-TLS-Server netcore3domain:443反代-docker 部署

grpcServer 端点构建

通过 vs2019 grpc模板 创建一个grpcServer项目
这个模板 已经自带了个简单 helloworld rpc方法了 我们这里 简单修改下 .proto 缓冲层定义 加入ServerSteam rpc 方法定义


syntax = "proto3";

package helloworld;

service Greeter {
// unary call
rpc SayHello(HelloRequest) returns (HelloReply);
// server streaming call
rpc SayRepeatHello(HelloRequest) returns (stream HelloReply);
// unary call - response after a length delay
rpc SayHelloAfterDelay(HelloRequest) returns (HelloReply);
}

message HelloRequest {
string name = 1;
}

message RepeatHelloRequest {
string name = 1;
int32 count = 2;
}

message HelloReply {
string message = 1;
}

2个rpc 端点实现代码

public class GreeterService : Greeter.GreeterBase
{
public override Task<helloreply> SayHello(HelloRequest request, ServerCallContext context)
{
return Task.FromResult(new HelloReply
{
Message = " grpcServer9090say: Hello  " + request.Name
});
}
public override async Task SayRepeatHello(HelloRequest request, IServerStreamWriter<helloreply> responseStream, ServerCallContext context)
{</helloreply></helloreply>

for (int i = 0; i <= 10; i++)
            {
                await responseStream.WriteAsync(new HelloReply { Message = " grpcServer9090say: Hello  "+i+"--" + request.Name });

                await Task.Delay(1000);
            }

            //return Task.FromResult(new HelloReply { Message = "Hello " + request.Name });
        }
    }

因为是简单演示 没有上 tls 证书 和 https
项目最后会以 docker形式 发布 所以这里我们修改了下默认 Kestrel 端口 改为了 9090

vs 中添加项目的 docker 支持 选 linux 平台后 vs 会帮你生成 项目部署的 dockerfile
ps: 我这里vs默认生成 dockerfile build 的时候报错 提示路径不对。没有深入研究 简单修改 dockerfile 里面的 路径 后 就可以编译了

FROM mcr.microsoft.com/dotnet/core/aspnet:3.0-buster-slim AS base
WORKDIR /app
EXPOSE 9090

FROM mcr.microsoft.com/dotnet/core/sdk:3.0-buster AS build
WORKDIR /src/grpcWebDemo
COPY ["grpcWebDemo.csproj", "/src/grpcNetCoreServer"]
RUN dotnet restore "/src/grpcNetCoreServer/grpcWebDemo.csproj"
COPY . .
WORKDIR "/src/grpcNetCoreServer"
RUN dotnet build "grpcWebDemo.csproj" -c Release -o /app

FROM build AS publish
RUN dotnet publish "grpcWebDemo.csproj" -c Release -o /app

FROM base AS final
WORKDIR /app
COPY --from=publish /app .
ENTRYPOINT ["dotnet", "grpcWebDemo.dll"]

可以用命令 试着编译下一下 刚刚生成的 dockerfile 如果没有报错 就可以了先放着 等会会用
docker-compose 把 Envoy 和 netcore grpc 部署在一个 docker 网段内

docker build -t helloworld/grpcnetcoredemo -f Dockerfile .

Envoy 部署

因为 Envoy 官方没有提供 二进制的 安装包 我们通过 grpc-web 官网的部署指引 把Envoy部署在 docker中

其中 envoy.yaml 是 Envoy Server 的配置文件 这里我们需要 调整一下的是 上游(netcore grpc api) 服务器地址这行的配置 需要按你自己的环境来修改-下面的这行配置按你 环境的区别 填写

hosts: [{ socket_address: { address: netcore-server, port_value: 9090 }}]

我们这里使用 ‘netcore-server’ 下面要说到的 docker-compose 中的 容器名称来替代实际地址

docker-compose.yml 配置如下

version: '3'
services:

netcore-server:
build:
context: ./
dockerfile: ./Dockerfile
image: helloworld/grpcnetcoredemo:0.0.1
ports:
- "9090:9090"
envoy:
build:
context: ./
dockerfile: ./envoy/Dockerfile
depends_on:
- netcore-server
image: helloworld/envoy
ports:
- "8080:8080"
links:
- netcore-server

如果上面的 配置 都没错通过 执行

docker-compose up -d netcore-server envoy

就能把 2 个 容器 拉起来了。 端口 分别是 8080 和 9090 2个docker 容器
到这里 服务端的 envoy 反代 和 grpc netcore-server 已经分别部署好了

在进行 前端grpc-web 之前 建议先测试下 2个容器

envoy 反代 就需要关注 上游端点 ip 地址配置这一行。
grpc netcore-server 我们拉起 9090 这个容器后 可以用c#的 grpc Clinet 代码直接调用下刚才写的 2个grpc 接口
看看是否成功。

Envoy-TLS 部署

使用 acme.sh 通过 letsencrypt 申请证书 这里略过具体细节。

需要更新的 envoy.yml 配置段落

tls_context:
common_tls_context:
tls_certificates:
- certificate_chain:
filename: "/etc/letsencrypt/grpc.xxx.com.crt"
private_key:
filename: "/etc/letsencrypt/grpc.xxx.com.key"

证书文件目录是通过 之前 docker-compose 文件 挂载的目录

envoy-tls:

container_name: envoy-tls
hostname: envoy-tls
image: envoyproxy/envoy:latest
volumes:
- evnoy/envoy-tls.yaml:/etc/envoy/envoy.yaml
- evnoy/letsencrypt:/etc/letsencrypt
ports:
- "443:443"
networks:
main:
aliases:
- envoy-tls

运行发布 docker 端点

docker-compose up -d netcore-server envoy envoy-tls

docker-compose down --remove-orphans

grpc-web

grpcWebClient 前端项目文件夹

miniprogram 微信小程序

细节参考 https://github.com/11os/grpc-mp

因为库的作者就提供了 mac 环境的 protoc 和 protoc-gen-grpc-web 二进制文件
我这里没有mac 环境。所以自己在作者源码上编译了 linux 环境下的二进制文件
测试pb 生成 可用。

二进制文件[linux]

.proto 自动生成 js文件

首先需要把 netcore-server 端点中的 .proto 缓冲层协议文件 通过工具生成 xx-pb.js 文件

分别解压 上面这2个工具,我这里选择把他们放在同一目录中 方面shell脚本执行 并发必须,你可以按自己的目录结构自行调整命令,

protoc.exe helloworld.proto –plugin=protoc-gen-grpc-web=protoc-gen-grpc-web-1.0.4-windows-x86_64.exe –js_out=import_style=commonjs:. –grpc-web_out=import_style=commonjs,mode=grpcwebtext:.

通过执行上面的命令后 得到 这2个js

  1. helloworld_pb.js
  2. helloworld_grpc_web_pb.js

编译 前端项目

$ npm install
$ npx webpack client.js

编译后得到 输出的

dist/main.js

使用 caddy webserver

有很多 webserver 可用。看重caddy 简单这里使用 caddy 来跑前端

Caddyfile 配置

localhost:8081 {
root ../../src/grpcWebClient

}

最后

当然是放上源码 github